This page serves as your website cheat sheet. This is where you will find helpful tips and best practices for editing your site content and links to SportsEngine resources.
Hey admins!
This page is best experienced in User Mode.
SportsEngine Help Center
SportsEngine has compiled a massive library of help articles that will walk you through almost every piece of functionality the platform has to offer. You can search by keyword to find relevant articles that will assist you in getting the most out of your website.
Specific help articles
Below is a list of the most frequently asked questions that link to SportsEngine's help article data base.
How do I add page elements?
What are news articles and how do I add them?
How can I collect data from fans?
How do I give someone access to edit the site?
My SportsEngine account guide
Training Video
SportsEngine Technical Support
Experiencing unknown errors or general technical issues?
You can start a conversation with support directly from your website. Log into your SportsEngine Account to see the blue "Need help?" tab on the right-hand side of the screen. Open this help experience and click on the "Contact Help" button to begin a conversation with a Customer Success Coach.
Using this new help experience you can also:
- View support articles while working in your system.
- Access Training Camp.
- Fill out a Registration Request Form for your upcoming season.
- Schedule a phone appointment.
| Days | Hours |
|---|---|
| Monday through Friday | 8am - 7pm CST |
| Saturday/Sunday/Holidays | 9am - 6pm CST |
//Permissions
It's easy to have multiple site editors help manage your site. Permissions are managed in your SportsEngine HQ (click Admin in the gray left menu). Here is a direct link to see your site members.
If you don't see someone in that list, they haven't become a member of your site quite yet. Send them these instructions:
- Head to https://runrocknroll.com and scroll to the very bottom
- To the left of the SportsEngine logo, click "Login."
- Login with your SportsEngine account or create a new one.
- Once you're logged in, you should see the black SE Bar across the top of your site. Click your initials in the upper right corner.
- Select "Connect to Site." This adds your account to the site's member directory. A webmaster can now update your permissions.
To help protect the layout and function of your site, it's best to only give access to certain pages/sections that an editor is responsible for. For example, the Las Vegas admin should only have edit access to the Las Vegas race and view access to this site guide and the element guide.
Webmasters have editing access to everything on the front side of your website and everything on the backend. You should not have more than a few webmasters. Here is a direct link to a saved report of your webmasters and here is the list of those in your Global Admin group.
Global admins --
When assigning permissions to those needing race page edit access, don't forget to give them View Access to the admin resource pages (Element Guide, Site Guide, Image Requirements, and Race Director Page).
// Assets Page + How To Use It
There is an Assets Page on your site that contains a number of important things that display globally. It can be accessed by clicking the "Assets" icon in the left menu bar that contains the "Edit/User Mode" switch. There are multiple elements of your site that can only be edited or updated using the Assets page.
These elements have been labeled accordingly to avoid confusion.
Access your ASSETS PAGE through the left Admin Tool Bar on your website.
If you need a global asset updated (i.e. navigation or footer item), reach out to Doug O'Donnell.
// Custom Classes
Page Elements and Layout Containers can be modified by adding one or more custom "classes" to the page element or layout container. This will change the appearance of your site.
You can add more than one class on a page element or layout container by separating them by a space.
Please use caution when adjusting page elements and layout containers that already have custom classes. There is no way to revert edits made to the custom class field. Make note of what classes are being used before changing them, in case you need to go back.
Reserved Classes
There are several classes that are used to identify global content that will display on every page, please refrain from using these. You can find them here (below) and on the assets page.
Reserved Classes for Global Assets
| Name/Reference | Element | Global Location | Required Class(es) |
|---|---|---|---|
| NA | Layout Container | Site Header | nav-extra |
| Extra Nav Links | Text Block Element | Site Header | desktop-nav-extra-links |
| Global Footer Text | Text Block Element | Site Footer | footer-text |
| Global Footer Button | Link Element | Site Footer | footer-button |
| Global Footer Logo | Single Photo Element | Site Footer | footer-logo |
| Social Media Links | Social Media Element | Site Footer | footer-social |
| Legal Links | Text Block Element | Site Footer | legal-footer-links |
Reserved Classes for the Home Page**
| Name/Reference | Element | Required Class(es) |
|---|---|---|
| home-hero | Layout Container | home-hero |
| full-width | Layout Container | full-width |
| text-color-white | Layout Container | text-color-white |
| featured-events-slider | Layout Container | featured-events-slider |
| extra-vertical-padding | Layout Container | extra-vertical-padding |
| full-width-container-constrained-content | Layout Container | full-width-container-constrained-content |
| merge-into-container-above | Layout Container | merge-into-container-above |
| text-with-image-container | Layout Container | text-with-image-container |
| image-with-text-container | Layout Container | image-with-text-container |
| column-gradient-continer | Layout Container | column-gradient-container |
| no-bottom-padding | Layout Container | no-bottom-padding |
| extra-top-padding | Layout Container | extra-top-padding |
| no-top-padding | Layout Container | no-top-padding |
| extra-bottom-padding | Layout Container | extra-bottom-padding |
| home-video | Code Elment | home-video |
| video-overlay-text | Text Block Element | video-overlay-text |
| container-background-image | Single Photo Element | container-background-image |
| text-block-call-to-action | Text Block Element | text-block-call-to-action |
| news-card-slider | News Aggregator Element | news-card-slider |
| inline-width | Link Element | inline-width |
| justify-center | Link Element | justify-center |
Layout Container
| Custom Class | Effect |
|---|---|
| hero-slider | Used to setup the display of hero images |
| news-card-slider | Used to setup the news card slider, should be used on News Aggregator Elements |
| sliders-in-tab-element | Used to setup the tab element medals slider, tabs should contain single photo elements |
| sponsor-slider | Used to setup the sponsor slider, layout container should contain single photo elements |
| featured-events-slider | Used to setup the featured events slider, layout container should contain single photo elements |
| hero-home | Added to the layout container containing a code element running the video and text block element containing overlay text and hero image. |
| four-column-container | Sets a 25% width on page elements in a single column layout container |
| column-gradient-container | Sets a padding on page elements and applies a gradient with a rounded border behind the layout container content |
| image-with-text-container | Defines a two column layout container for displaying image and text side by side |
| text-with-image-container | Defines a two column layout container for displaying text and image side by side |
| merge-into-container-above | Moves layout container by appending to the container above it |
| merge-into-container-below | Moves layout container by appending to the container below it |
| accordion-container | Sets a layout container to display as an accordion |
| sponsor-50-50 | Sets the display for layout container containing a Text Block Element and Single Photo Element |
| race-event-card-container | Used on multi column layout container containing text block elements and link elements in columns |
| text-color-white | Sets page element text color to white in user mode |
| no-padding | Removes padding from layout container |
| no-vertical-padding | Removes top & bottom padding from layout container |
| no-top-padding | Removes top padding from layout container |
| no-bottom-padding | Removes bottom padding from layout container |
| extra-vertical-padding | Adds extra top & bottom padding to layout container |
| extra-top-padding | Adds extra top padding to layout container |
| extra-bottom-padding | Adds extra bottom padding to layout container |
| hide | Hides layout container from view of site visitors |
| padding-collapse-y | Reduces top/bottom padding on partner/sponsor content templates on race pages |
Page Elements
| Custom Class | Effect |
|---|---|
| container-background-image | Sets a Single Photo Element as the background image of its parent layout container in user mode |
| accordion | Defines a Text Block Element to display as an accordion element |
| adblocker-alternative | Defines alternative image to display when ad blocking is enabled by users |
| quick-link | Applies secondary display style for Link Elements |
| text-block-call-to-action | Sets a Text Block Element to display as a Call To Action Element |
| subtitle-color-white | Sets page element subtitle text color to white in user mode |
| no-margin | Removes margin on page elements |
| inline-width | Sets flexible width on Link Elements |
| justify-left | Used to position Link or Document Elements |
| justify-center | Used to position Link or Document Elements |
| justify-right | Used to position Link or Document Elements |
| hide | Hides page element from view of site visitors |
| grd-series-card | Contains text and background image |
| grd-series-image | Single photo component, contains guitar pick image |
| grd-race-card | Contains all text and image needed |
How to build Series + Race cards:
To build the cards - 3 column layout container for the GRD series cards, and a 2 column layout container for the GRD race cards
Text block component - How to build GRD series race cards and background gradient (grd-series-card):
<p><a href="https://www.google.com"> </a></p>
<h5>Save up to $41</h5>
<h6>Register now</h6>
Single photo component and guitar pick (grd-series-image)
Text block component - How to build GRD race card and image (grd-race-card):
<p><a href="https://www.google.com"> </a></p>
<h3>SAN DIEGO | June 4-5 2022</h3>
<h4>Marathon, Half Marathon, 5k</h4>
<h5>LIMITED SPACES LEFT</h5>
<h6>Register Now</h6>

Example of grd-series-card and grd-series-image custom class
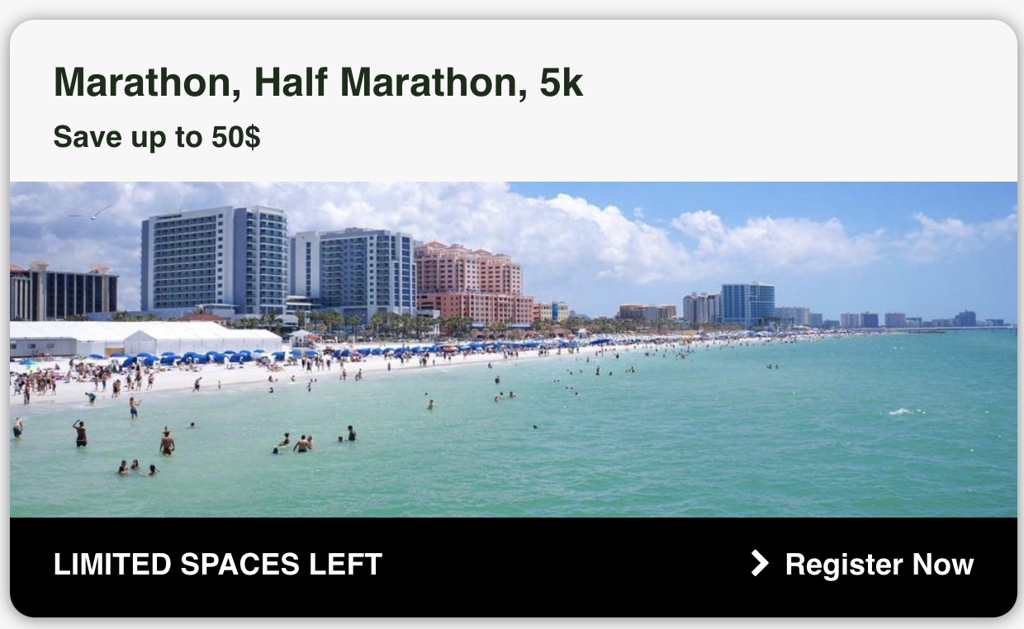
Example of grd-race-card custom class
**Home Page Site Guide
Detailed examples of home page classes.
// Image Sizing + Aspect Ratios
Site Images
The following are tips to help you achieve the best possible image display for your site.
#1 - USE LARGE IMAGES
We suggest that you use the largest possible images you have (but no more than 2000px wide). Using large images will ensure that your image will never have to scale-up in size and will only need to scale-down if necessary. Scaling images up can lead to stretched, blurry, or pixelated results.
#2 - STICK TO THE CORRECT ASPECT RATIO
We find that aspect ratio is very important when adding images to slideshows, call to actions, site headers, etc. For example, if your news slideshow element is set to a 2:1 ratio–then a 2000px by 1000px image would be appropriate.
It is wise to avoid using a primarily vertical image within a primarily horizontal page element and vice versa. Doing so may lead to excessive stretching and blurriness.
#3 - SAVING FILES
When saving out your file, make sure that the resolution or dpi is not more than 72. Also, make sure you are saving it as a web file like a jpg or png. Only save out as a png if image needs to have a transparent background. Jpgs are smaller file sizes and are more efficient for your website's load speed.
Image sizing specific to your site
| Element | Recommended Size (W x H) | Aspect Ratio |
|---|---|---|
| Home Page Hero Video | 1920 x 1080 | 16:9 |
| Home Page Hero Mobile Image (Single Photo) | 500 x 281 | 16:9 |
| Home Page Promotions Ad (Single Photo) | 640 x 360 | 16:9 |
| Home Page Featured Events Race Card CTA | 400 x 400 | 1:1 |
| Home Page Featured Events Background Image | 1600 x 800 | 2:1 |
| Home Page Billboard Image | 800 x 600 | 4:3 |
| Home Page CTA Portrait | 300 x 400 | 4:3 |
| Home Page News Card Images | 600 x 300 | 2:1 |
| Home Page News Card Section Background Images | 1600 x 685 | 21:9 |
| Home Page Video Section, Video Embeds | N/A | 16:9 |
| Race Page Hero Media Slider | 1800 x 600 | 3:1 |
| Race Page Race Card Image | 350 x 350 | 1:1 |
| Race Page Medal Card Image | 260 x 260 | 1:1 |
| Race Page Default CTA Image | 300 x 225 | 4:3 |
| Race Page Background Color Fade (Side Gutters) | 1600 x 1600 | 1:1 |
| Race Page Video Section Background Color Gradient | 1020 x 680 | 3:2 |
| Race Page CTA Section Background Color | 1020 x 680 | 3:2 |
| Catalog Page Hero Media Slider | 1800 x 600 | 3:1 |
| Catalog Page Results Card Image | 350 x 350 | 1:1 |
| News Article Image | 1200 x 600 | 2:1 |
| Internal Page Header Image | 1800 x 450 | 4:1 |
NOTE: It is very important to keep in mind that the exact pixel size does not matter as much as the ratio. All images will scale down to the horizontal width of their column. As long as all images in same row are the same ratio, they will display the same height.
// Relative vs Absolute Links
Absolute Links are static and the link target will always be whatever is manually entered into the path field. Absolute Links include a root domain (www.demosite.com) and a path (/link-path) to form a full, static link (www.demosite.com/link-path).
- If the root domain (www.demosite.com) ever changes, this absolute link would remain the same.
- Therefore, absolute links are best for external links and should be avoided for internal links (pages within the same website).
Relative Links are dynamic and allow flexibility to change the root domain. For relative links, you only manually set the path (whatever is after ‘.com’ - so ‘/…..’ - forward slash + friendly names or anything starting with the forward slash and beyond). That path will be appended to whatever the current root domain is.
- If the root domain ever changes, the new link would be the new root domain and the same path.
- **These should always be used for internal links.**
Tips on Same Window versus New Window Links
- Internal links should open in the Same Window
- External links should open in a New Window
- Hyperlinked documents should be set to open in a new tab
Relative Links using the Link Element

Relative Links using the Single Photo Element

Once you've updated 'Link to Image' from 'None,' 'select 'Other' as your link protocol.
Relative Links within a Text Block
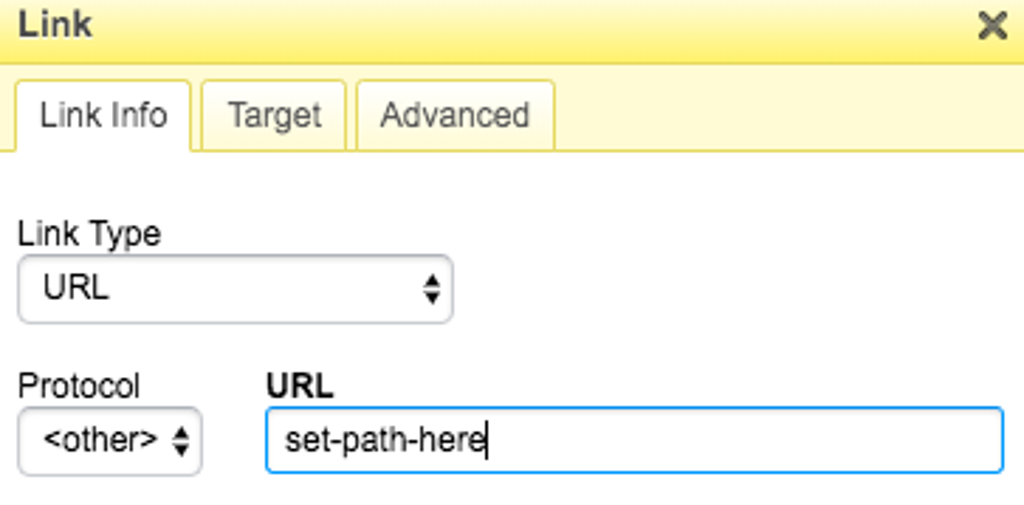
// Documents
Uploading and Linking Documents
If you'd like to upload a document to a page, use our Document page element.
If you'd like to link to a document, using hyperlinked text or our Link page element, you'll want to upload the document to the website first, then link to it. We have a page reserved for this purpose!
- Navigate to the Documents page. It's under Assets, under the Document Collector.
- Upload your document using our Document page element.
- Once your document is on the Documents page, click the link so it opens in a new tab. Copy this URL (command + C)
- Navigate to the page you want your document linked.
- If you're using a Link element, paste (command + V) the URL into the URL field, making sure to remove the 'https://' at the front of your pasted link, and using the toggle for 'https://'
- Give the link a title and choose if you want the link to open in a New Window. Save!
- If you want to hyperlink the document behind text, highlight the text you wish to link.
- Locate and click on the paperclip icon in the text block tools, in the upper left area under the 'B' for bolding.
- Paste (command + V) the URL into the URL field, making sure to use the toggle for 'https://'
- Use the Target tab to choose if you want the link to open in a New Window or the Same Window. Save!
- Locate and click on the paperclip icon in the text block tools, in the upper left area under the 'B' for bolding.
- If you're using a Link element, paste (command + V) the URL into the URL field, making sure to remove the 'https://' at the front of your pasted link, and using the toggle for 'https://'
Locating Documents
If you're looking to find a document that's been uploaded to your site, reference the Document Collector page that's under Assets. This page is a master page that accumulates ALL of your documents that belong on your site. This page will allow you to sort, edit, view and delete old documentation that might need changes.

This is an example of a document uploaded with the Document Page Element

This is an example of a document uploaded and then linked to with an inline hyperlink.
// Social Media Posts + Embeds
Third Party Embeds
Most social media services have feeds that can be embedded on to your website. This can be done by copying the embed code from the service and applying it to the site using the Code page element. Below are links to pages that will help create your specific embed code.
Embed Instagram feed
// Search Engine Optimization
Friendly URLs
Friendly URLs are a great way to keep your website clean and easy to navigate. It also helps your website show up in search engines more often.
Add Friendly URLs throughout your site by selecting Edit Page Details on the Options tab of each general page.
Below are the friendly URLs that should never be changed:
- Home Page: Make sure the friendly URL for the Home page is /home
- Assets Page: Make sure the friendly URL for the Assets page is /assets
SEO Tips
Below is a link to an article written by SportsEngine's SEO team that shares valuable information on how to optimize your site for search engines.

